martes, 15 de abril de 2014

Rosquillas de Semana Santa/ Easter Brioches

Hola a tod@s!!
Llega la época de Semana Santa y además de comenzar a disfrutar del buen tiempo (o al menos intentarlo) en éstas mini vacaciones podemos encontrar cientos de recetas dulces típicas de ésta época.
Para mí, el postre por excelencia son las rosquillas (o como en algunos sitios se les llama: pan dulce o brioches)
Me encanta despertarme en mi casa y acompañar el desayuno con un trozo de una buena rosquilla.


Hoy quiero compartir con vosotros mi humilde receta, aunque seguro que hay miles de variaciones y diferentes maneras de hacerlas.
Allá vamos:

Ingredientes:
Un taco de levadura fresca (aprox. 80 gr)
Un vaso grande de leche
Medio vaso de aceite de oliva o de girasol (también se puede utilizar manteca)
60 gr de azúcar
2 huevos
Una pizca de sal
600 gr de harina o la que admita


Para comenzar mezclamos en un bol la leche, el aceite, el azúcar y la levadura deshaciéndola bien (debe de estar a temperatura ambiente  lo mezclamos hasta que todos los ingredientes estén bien integrados.
Añadimos a la mezcla anterior los dos huevos batidos y los mezclamos bien.


En un cuenco a parte, echamos la harina y la pizca de sal; ahora añadimos la mezcla anterior y comenzamos a mezclar para obtener una masa, añadiendo más harina según sea necesario.
Cuando la masa se vuelva difícil de manejar la volcamos sobre una superficie y comenzamos a amasar con las manos.

Cuando hayamos obtenido una masa uniforme, hacemos una bola y la dejamos en un recipiente, tapada con un paño limpio para que comience a subir (sobre unos 15 minutos).


Cuando su tamaño haya aumentado, podemos comenzar a formar las trenzas de rosquilla: cogemos un trozo de masa y lo dividimos en dos, una porción más grande que otra. Las haremos rodar sobre la mesa, hasta llegar a formar dos rollos (uno más largo que el otro).

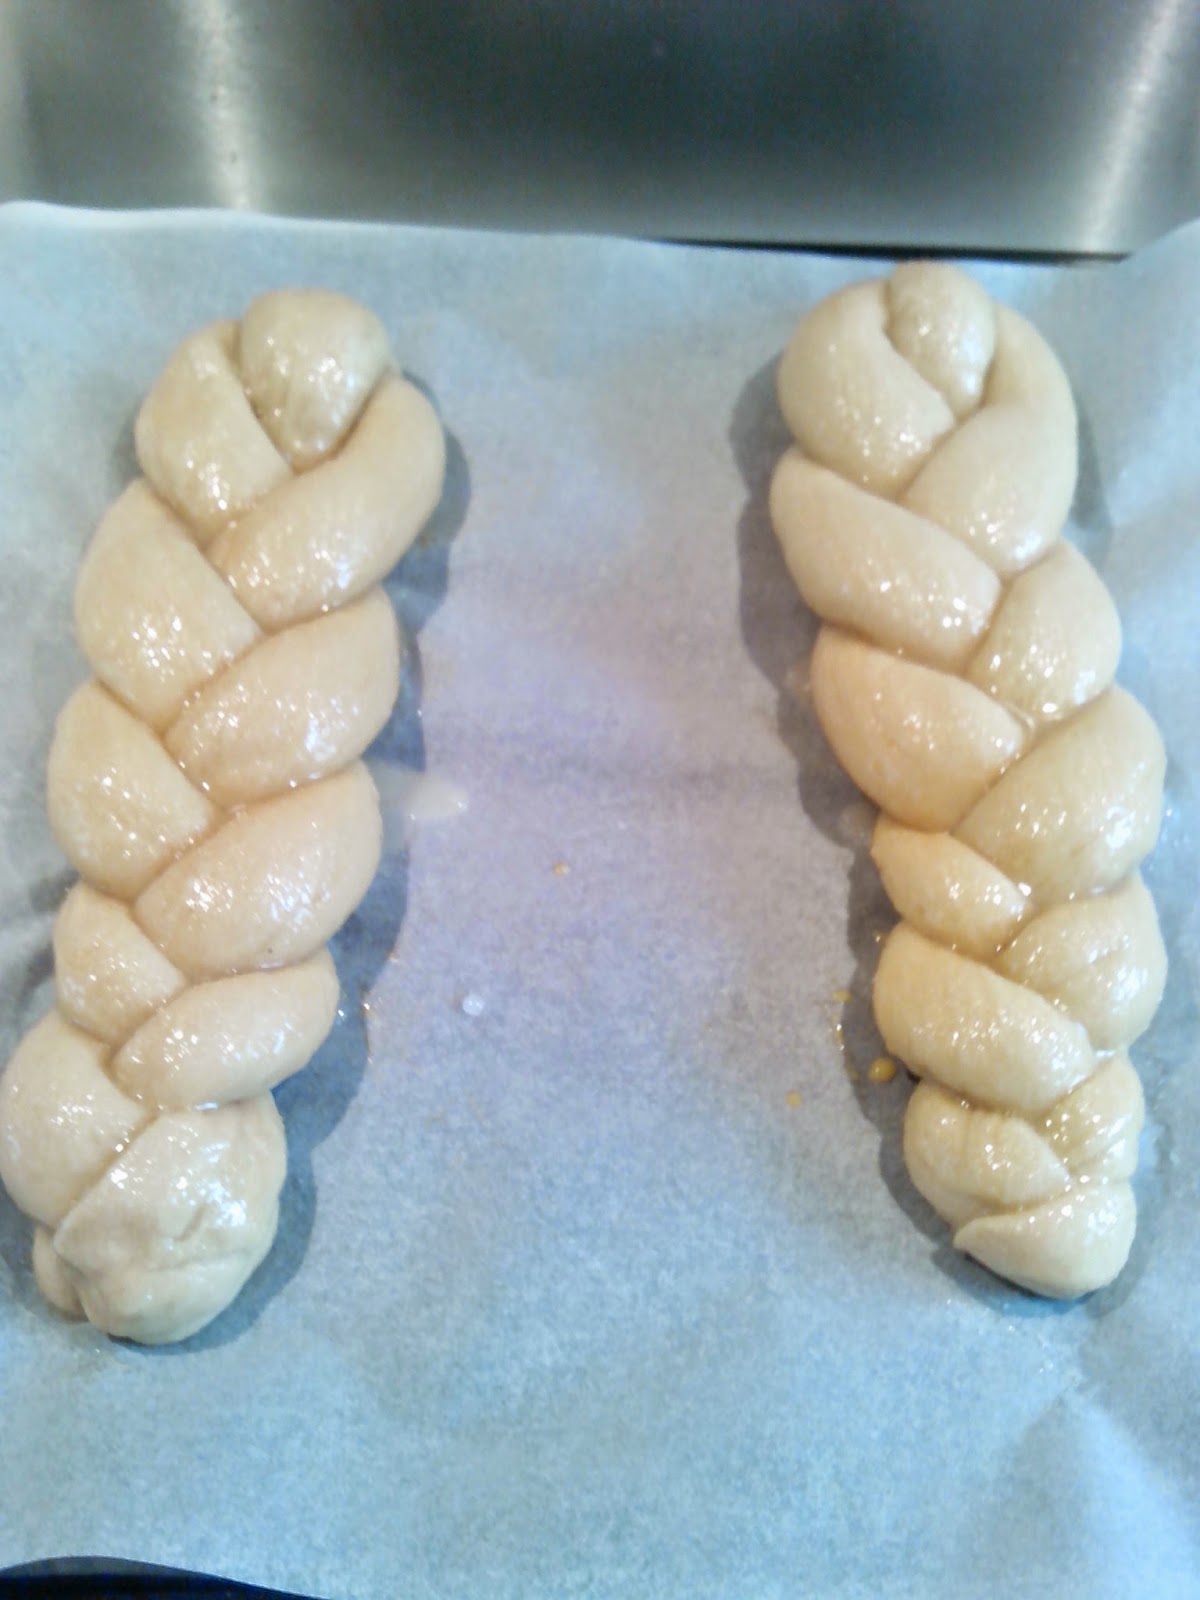
Doblamos el rollo más largo por la mitad y colocamos el más corto en el medio, así comenzamos a formar nuestras trenzas de Semana Santa.


Cuando tengamos las trenzas formadas, las vamos colocando en la bandeja del horno y es el momento de pintarlas con clara de huevo con la ayuda de un pincel. después de haberlas pintado, podemos pasar de nuevo el pincel impregnado en una mezcla de azúcar y agua (opcional).


Las dejamos levar aproximadamente de una a dos horas y media hasta que su volumen se doble, entonces las metemos en el horno a 200º durante 20 minutos vigilando que no se nos quemen. Los tiempos dependen del cada horno, y en lugar de encenderlo con calor arriba y abajo, se deba de encender con calor solamente por abajo para que no se quemen, durante 30 minutos aproximadamente.


Como podéis ver, esta es una manera sencilla de hacer rosquillas caseras, aunque seguramente que conocéis diferentes formas e igual de ricas de elaborarlas.


Espero que disfrutéis de unas buenas mini vacaciones y que os animéis a elaborar algún postre o dulce típico de éstas fechas.

V. S. te dedico este post y te envío un besazo enorme, muy pronto estarás como nueva...Muaaack!!!

Hasta pronto!!

English Version:

Easter time is here and during this mini vacations, apart from starting to enjoy the good weather (or at least try) we can also find hundreds of sweet recipes that we can bake during this time.

One of my favourite recipes is the brioche or sweet bread; I really love to wake up at home and have a good piece of home made brioche for breakfast :)
Today I would like to share with all of you my recipe, although I´m sure there are thousands of variations and everyone has their own tricks.


Let´s start!!

Ingedients:

80 gr of fresh yeast
Big glass of milk
Half glass of olive oil (but you can also use butter)
60 gr of sugar
2 eggs
Pinch of salt
600 gr flour


First we mix in a bowl the milk, oil, sugar and yeast and mix until all the ingredients are well combined, then we add the two eggs and keep mixing.

In another bowl mix the flour and the pinch of salt and we add this to the other mixture, keep on working the mixture until we start to get a nice dough, always adding flour if needed.
When the dough becomes difficult to manage we pour on a surface and start working with our hands.
When the dough becomes smooth, we make a ball and leave in the bowl resting during 15 minutes covered with a clean cloth.


After the 15 minutes we can see that the dough has risen and we can start forming our brioches:

take a piece of dough and divide it into two, one larger than the other portion; then make the portions roll on the table and form two separate rolls (one longer than the other). Turn the longer roll in half and place the shortest in the middle, cross the outside parts and form the brioche.


Now, we can paint the brioches with the egg and after that we mix sugar and water and put it on top with the brush (optional)
Leave the brioches rise during 1 or 2 hours until the size is doubled. After that put them in the oven during 20 minutes 200º (this can be different depending on the oven).


Now we can enjoy our homemade brioches, you can see it´s not so difficult and I´m sure you have your own brioche recipe that you can also share if you like.


I hope you have a nice Easter holidays, see you soon!!

I dedicate this post to V. S.: you will get better really soon, lots of love!!!

<a href="http://www.bloglovin.com/blog/11927323/?claim=kjbxv96wv8d">Follow my blog with Bloglovin</a>


jueves, 27 de marzo de 2014

Nocilla casera/ Homemade Nutella

¡¡¡Leche, cacao, avellanas y azúcar.....!!!
Seguro que casi todos sabéis como sigue esta canción tan mítica de nuestra infancia.
Me encanta la nocilla, crecí con ella, y las tardes jugando en la calle con 'las nenas' no eran lo mismo sin el bocadillo de nocilla que nos preparaba nuestra madre (amén de muchos otros bocadillos que estaban riquísimos)

I love nutella. When I was small, I used to play all the time outside with my girlfriends, it wasn´t the same without the Nutella sandwich that our mums used to prepare (but also many kinds of delicious sandwiches :))


Hoy en día me sigue encantando la nocilla y el chocolate, pero siempre buscando una alternativa más sana,  natural y menos llena de productos químicos añadidos. Así, me he decidido a hacer mi propia nocilla en casa y os puedo asegurar que el resultado no me puede gustar más.

Nowadays I still like Nutella and chocolate, but I always prefer to find a healthier and natural alternative without all that chemical stuff that they add to all the products that we eat. So, I decided to make my own Nutella... and let me tell you that I reaaaalllyyy like the result.

Es facilísimo y además no lleva mucho tiempo. Vamos allá:
Super easy and doesn´t take a lot of time. Here we go!

Ingredientes/Ingredients:

100gr de chocolate negro/ 100gr dark chocolate.
80gr de avellanas/ 80gr hazelnuts.
Un chorro de leche (también se puede utilizar leche de almendras o soja)/ 2tbsp milk; soy mik or almond milk.
50gr  de azúcar integral/50gr brown sugar.
30gr de margarina ligera/30gr light margarine.

1º) Después de pelar las avellanas, las tostamos en el horno (150º), removiéndolas de vez en cuando (hasta que queden un poco doradas). 
Cuando estén listas las sacamos y las ponemos encima de un paño o rodillo  para ir quitándoles la piel en la medida de lo posible.
After peeling the hazelnuts we put them in the oven (150ºC) until they get a brown color. When they are ready try to take the skin off, it´s possible that some skin sticks and becomes difficult to remove, that is ok, you can leave it. 


2º) Trituramos las avellanas en el vaso de la batidora; poco a poco vamos añadiendo el azúcar y seguimos triturando hasta que se hayan mezclado bien.
Grind the hazelnuts (with a food processor) until they get fine and powdery, after that we add the sugar and keep mixing well.

3º) Derretimos el chocolate negro y cuando esté listo le añadimos la margarina y el chorrito de leche.
We melt the chocolate and when it´s ready we add the margarine and the milk.


4º) Por último, añadimos el chocolate a la mezcla de las avellanas y batimos hasta que la mezcla se quede bien integrada.
Finally, we add the chocolate to the hazelnuts and mix well until we get a smoothy cream.


5º) Guardamos la mezcla preferiblemente en un bote de cristal y la dejamos en la nevera.
Keep your nutella in a glass jar in the fridge.


Me encanta el sabor,  y me atrevería a decir que supera a la comprada. A los que no os guste el chocolate negro, no os preocupéis porque no se nota amargo (también podéis probar a hacerlo con chocolate blanco o con leche, pero éste sí va a tener más azúcar)  y la cantidad de azúcar que queráis añadir es a gusto de cada uno, también se puede no añadir azúcar o sustituirla por algún endulcorante o sirope de ágave... hay múltiples posibilidades.


I really love the taste and I would dare to say is much better that the one we find in the supermarkets. For those you don´t like the dark chocolate, don´t worry because the taste is just fine (you can also try to make it with milk or white chocolate but it would have more sugar). You can always choose the amount of sugar, or just add agave syrup or any other option you might like.

Espero que lo intentéis en casa, merece la pena y una sana alternativa, ideal también para los niños y personas que necesitan tener cuidado con el azúcar pero que no quieren renunciar al chocolate. 

I hope you try this at home, it is worth it, it is a healthy alternative, also good for the children and all those who like chocolate but cannot take so much sugar.


Hasta la próxima!!!
See you soon!!!

<a href="http://www.bloglovin.com/blog/11927323/?claim=kjbxv96wv8d">Follow my blog with Bloglovin</a>

lunes, 17 de marzo de 2014

Macarons

Para preparar estos deliciosos bocaditos sólo necesitamos tres ingredientes y cuando por fin (después de casi tirar la toalla) se le coge el tranquillo, quedan perfectos para acompañar cualquier celebración o como detalle regalo como es el caso.


To bake these delicious sweets, we only need three basic ingredients and when I finally got them right (after almost quitting on them), they were perfect for meeting friends or a present in this case.

El macaron es un tipo de galleta tradicional francesa que se dio a conocer durante el siglo XVI, surgiendo del horno del pastelero de la corte francesa, como galletas redondas con base plana y fue durante el siglo XIX donde se empezaron a unir de dos en dos con un relleno en el medio.

The macaron is a traditional french cookie, unveiled during the sixteenth century, emerging from the oven´s bakery of the French court. First as flat cookies with a round base; was during the nineteenth century that they began to put them together in pairs with a filling in the middle.

Mi experiencia con los primeros macarons fue bastante exitosa y estaba muy contenta, habían salido más que aceptables (que tiemble Ladurée!!)

I was very happy with  the first macarons that I baked, they were more than ok (get ready Ladurée, I´m here!!)

La segunda vez, casi sintiéndome una profesional y totalmente confiada....desastre!. Tercera vez...los pobres macarons parecían salir cansados del horno, modo frustración 'on' y sobredosis de azúcar (pa qué queremos mas :))

The second time, almost feeling like a professional and full of confidence.....disaster!. Third time---my poor macarons came out from the oven feeling tired and not looking good at all; frustration mode 'on' and sugar overdose (just what I needed :))

Estos son los terceros/ the third ones:

La tercera tanda de Macarons parecían haberse caído desde un segundo piso. / The third ones, they look like they jumped from the second floor


Ok, último intento y un extra de paciencia, medidas exactas y allá vamos!!
Ok, last try, with extra patience, exact measures and here we go!!


Ingredientes/ingredients:
110 gr de almendra molida/ 110gr ground almonds
220 gr de azúcar en polvo/ 220gr powder sugar
110 gr de claras de huevo/ 110 gr egg whites
30 gr de azúcar blanquilla/ 30gr fine sugar
Colorantes (opcional)/ gel food colouring


Primero tamizamos la almendra molida junto con el azúcar en polvo (repetimos 2 ó 3 veces esta operación).
Segundo, comenzamos a trabajar con las claras de huevo, es importante pesarlas para llegar a la medida exacta (110gr) dependerá del tamaño de los huevos que estemos utilizando.


Batimos las claras a punto de nieve, cuando empiecen a espumar añadimos los 30 gr de azúcar poco a poco y seguimos batiendo hasta que las claras estén montadas, esto lo sabremos porque se forman unos piquitos al batir y al darle la vuelta al bol no se nos caerán (prueba de fuego)


First we sieve the powder sugar together with the almonds (one or two times). 
Egg whites:(it is better to measure them before, to get the exact 110gr, it depends on the size of the eggs). In a separate bowl whisk the egg whites until they form soft peaks, add the fine sugar in two times and continue to whisk until the whites are thick and glossy (you should be able to hold the whites upside down without them falling out).


El macaronage (paso delicado): vamos añadiendo a las claras la mitad de la mezcla de azúcar en polvo y almendra; con una espátula mezclamos con movimientos envolventes, cuando esté integrado añadimos la otra mitad y repetimos. No debemos de pasarnos mezclando pero tampoco quedarnos cortos; (si cogemos la mezcla con la espátula y ésta cae como si estuviera formando una cinta...ya tenemos nuestra masa).


The macaronage (this is a delicate step): gently stir in half of the powder sugar and almond mix and then the other half. The mixture will lose some air and become quite loose, this is ok.

Podemos dividir la mezcla en dos partes y añadir el colorante deseado (personalmente, me gustan sin colorante, pero en este caso también he utilizado rosa y azul).

Now we can divide the mixture in two and add the colouring food gel that we like. (I like them without colour but in this case I also used blue and pink)

Pasamos la mezcla a la manga pastelera (no hace falta poner boquilla) y empezamos a formar nuestros macarons, sobre la bandeja del horno que habremos cubierto con papel anti adherente (se puede poner un poco de la mezcla en cada esquina de la bandeja para que el papel se sujete bien) con la manga en vertical presionamos suavemente durante 4 segundos.


We can now put the mixture in the piping bag , place the paper template onto a baking sheet  (we put a little bit of the mixture under every corner of the baking sheet to stick it to the tray) and form small blobs on the sheet, press softly with the piping bag during 4 seconds.

Los dejamos secar durante 30-45 minutos, o cuando veamos que al tocarlos ya no se pegan a los dedos.

Before putting the macarons in the oven, we have to let them dry during 30-45 minutes, we can touch one softly to check if it is not wet or sticky anymore.

Una vez que la superficie esté seca, los metemos en el horno precalentado a 150º durante 13 minutos.
Debemos dejarlos enfriar fuera del horno en la misma bandeja, ya que son delicados y se pueden romper. Una vez que estén fríos, se deberían de poder despegar con facilidad.

Ya suben!!/ Rising! 


Once the surface is completely dry, we place the macarons in the oven 150º during 13 minutes. After that, we should let them cool down, otherwise they could break easily.


Et voilà! ya tenemos nuestros macarons!!, en este caso los he rellenado de nocilla y mermelada de fresa, pero hay múltiples posibilidades: ganache de chocolate, nata, merengue, buttercream...


Et voilà! we have our delicious macarons!! in this case the filling is nutella and also strawberry jam, but there are many possibilities: ganache, cream, merengue, buttercream...


Espero que los intentéis hacer en casa. Hasta la próxima!
I hope you try to make them at home. See you soon!!!

<a href="http://www.bloglovin.com/blog/11927323/?claim=kjbxv96wv8d">Follow my blog with Bloglovin</a>